Tomato Growing Tips
These tomato growing tips are for inexpensive ways to stretch your gardening budget. After all, part of the reason for gardening is so you pay less for vine-ripe tomatoes! Not to mention the deliciousness of homegrown tomatoes. 😀
There’s a book out on the $64 tomato, where a gardener says that after he tallied up all his costs associated with his tomato plants, and divided it among the tomatoes harvested, it came to something like $64 a tomato.
No, it doesn’t cost that much! I haven’t read the book, and I’m sure part is tongue-in-cheek. But it is true that if you don’t watch it, you, too can be spending a whole lot more than you intended.
Tip #1: Household Items
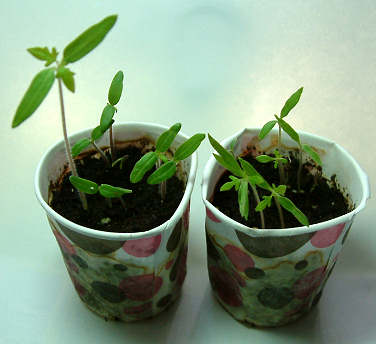
Tomato Seedlings
Some of the household items I like using include used (washed) pantyhose; cut them in wide strips and you can use them for tying up the tomatoes to their stakes.
Small 3-ounce Dixie cups are fantastic for germinating tomato seeds and really inexpensive (especially if you get the store brands).
Gallon containers like plastic milk jugs and tea jugs are great for mixing up fish and seaweed emulsion fertilizer drenches. Just remember to label the containers with their new ingredients! Two liter bottles are fine as well.
All kinds of household plastic and waxed paper containers can be used for temporary potting, before setting out in the garden. Just make sure to punch holes for drainage.
Tips For Fertilizers and Soil Amendments
Most fertilizers have a high nitrogen component, which is not what you want for tomato fruits! And most fertilizer instructions want you to apply them far too often. If you have enriched your garden soil with compost or composted manure, you will need far less fertilizer. I generally apply my fertilizer at half the strength suggested on the label instructions with good results.
If you have the room, set up a compost pile. depending on your climate it can take anywhere from a month to a year for finished compost, but your tomatoes will thank you. And since compost is made from food scraps you’d normally throw away, it’s a great way to recycle.
If you live in an area with cows or horses, see if you can arrange to cart away some of the manure; normally you can get your manure free this way — put it in your compost pile to make it even richer.
OK, what if you don’t have room for a compost pile (or you just don’t want one). Go to your local garden center and find a fertilizer which can be diluted before applying to the plants. One small box of Miracle Gro is pretty inexpensive (I like Miracle Gro for Roses) and lasts quite awhile.
Thoughts on Garden Equipment
If you have a small garden (100 square feet or less), try renting a tiller for a day or two instead of buying one. If, however, you have a larger garden, buying your own tiller may make sense for the long run.
A shovel, spade, hoe and pitchfork are really all the hand tools you need. The pitchfork is optional, and mainly used if you have a compost pile.
You can make your own tomato cages from concrete reinforcing wire; useful if you have a lot of tomatoes that need staking as they do seem to last forever. Rebar makes for good tomato stakes, if you have easy access to it. But if you have only a couple-three plants, you can use commercial tomato towers and cages and save yourself the trouble. I’ve found that most commercial cages/towers last quite a few years and tend to be easier to store.
Don’t have a lot of room for a garden? I’ve found the 5-gallon grow bags are great for medium-sized indeterminate tomato plants and are pretty inexpensive. You can go as small as 3-gallon for smaller and determinate tomatoes, and 10-gallon for the larger indeterminates.
Plants Versus Seeds
Hands down, it’s cheaper to plant seeds than buy tomato plants. Some of the best-producing tomato varieties may not be available as plants in your area. For $3, you can grow 20 to 40 plants from seeds…or you can buy one plant.
Keep in mind that if you store them in a cool, dry place, your tomato seeds will be good for several years. So if you don’t plant the whole pack this year, you automatically have seeds available for next (and the next…)!
Now it’s true that if you plant seeds you need to get some seed-starting soil; you don’t want to use anything from the garden, as it will have bacteria that may cause problems. But you’ll use very little per seed; a small 4-quart bag can be used for many, many dozens of seeds. Around here, the big-box garden centers (Home Depot, Lowe’s, etc.) carries the small bag for between $4 and $5.
You will also need a germination tray or two, but they are also inexpensive and last year after year. I had one windowsill mini-greenhouse that finally bit the dust…after 10 years.
Final Tomato Growing Tips
You really don’t need to spend a fortune to grow your tomatoes; household items will suffice in many situations, and other more permanent items (shovels, cages, etc.) will last many years if you treat them properly.
Not all tomato varieties produce the same number of fruits. Cherry tomatoes are far and away the most prolific! In general, the larger the tomato fruit size, the fewer the tomatoes produced. The heart-shaped tomatoes as a group tend to produce the least. For a continuous crop of larger (i.e. not cherry) tomatoes, go for the indeterminate plants whose fruits average around 6 to 10 ounces.
So go ahead; grow your tomatoes! And may your homegrown tomatoes be abundant and delicious-tasting.
Tomatoes For a New Gardener
If you’re just starting out with your garden, you may want to know some good “beginner” tomatoes. What are some tomato varieties that are easy to grow, good to eat and fun to watch develop?
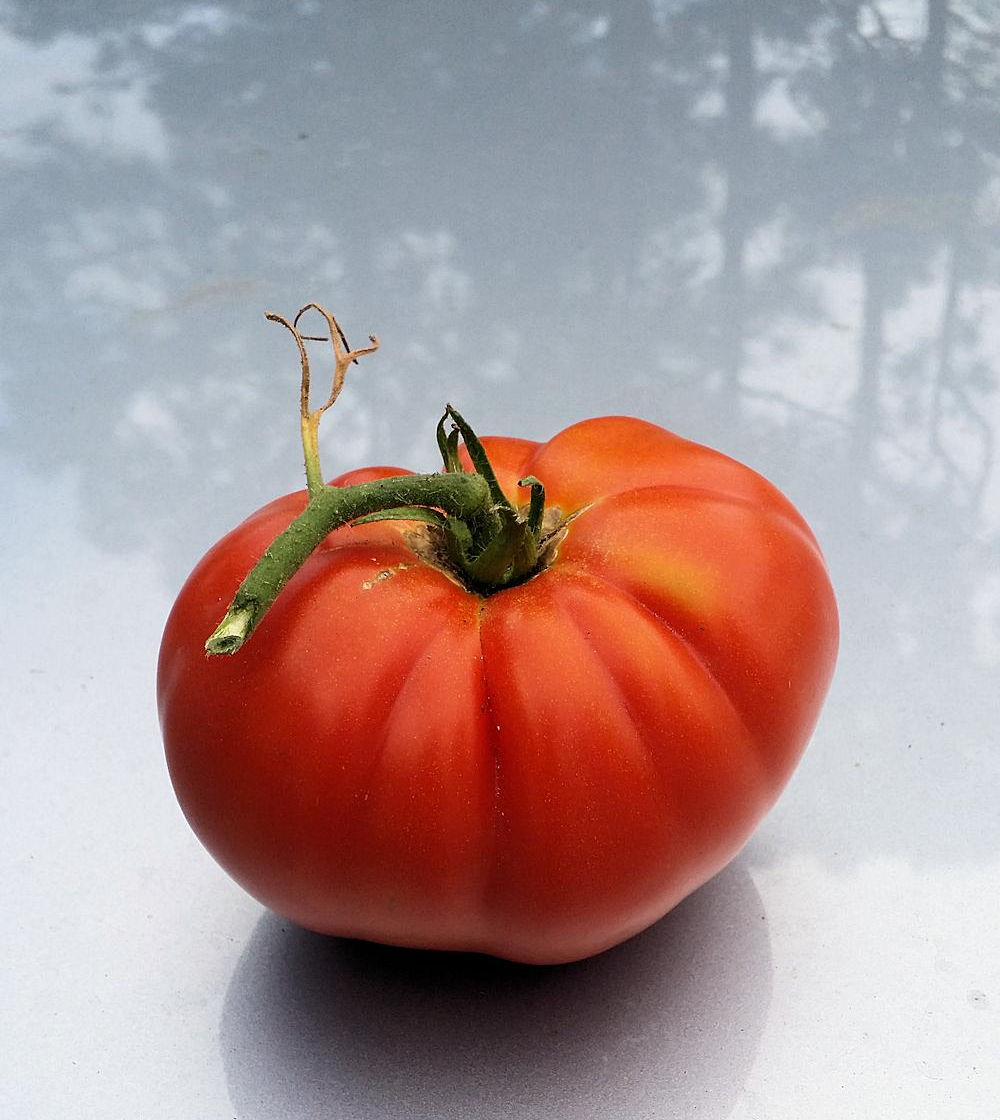
Big Beef Tomato
Tip #1 for a New Tomato Garden
If you’ve never grown tomatoes before, I suggest growing just three plants your first season. Why?
First, you want the best chance for your plants to grow and produce tomatoes. This means that you’ll have to watch your plants and see how they react to your particular growing conditions. If you put your plants out into your garden too soon, they might get killed by frost or stunted by chilly weather. If you plant too late, you risk both the plants not pollinating well because it’s too hot, or your fruit not ripening fast enough before season end.
So, your first planting season shouldn’t be more than three tomato plants; the next season, after you become familiar with the growing conditions, you can plant with abandon!
Which Tomatoes for a New Gardener?
I suggest three different varieties for your tomato garden; a determinate, a cherry and an heirloom. These three will give you tomatoes both early on and all through the season.
Determinate: Determinate tomatoes tend to be smaller plants and bear fruit earlier. Many don’t even need staking, which is a plus for the beginning home gardener. Determinate tomatoes tend to be early-to-mid-season tomatoes, so they will be among the first of your homegrown tomatoes harvested. In general, I’ve found the determinate tomatoes to be a bit more resistant to diseases.
Cherry: A cherry tomato is one of the very easiest to grow, and the plants usually very prolific. Cherry tomatoes are small (usually less than 2 ounces) and are born in clusters…sometimes very large clusters of 10 or more tomatoes! Because the plants are so prolific, there are usually tomatoes ready at any given time. Great for salads and snacking. The cherry tomato plants are normally indeterminate, so they continue producing their fruit for the entire season.
Heirloom: Finally, I suggest an heirloom, because most taste absolutely divine! Heirloom tomatoes tend to be mid- to late-season, so they are ready for harvest after the determinate and cherry tomatoes produce. I like the beefsteak-style heirloom tomatoes for their truly tomato taste, and the fact that they make great tomato sandwiches!
So, those are the tomato types I suggest for the first-time tomato gardener. Now on to the varieties you can plant!
Tomato Variety Suggestions
I’ll give you two different groups of three. The first group should appeal to anyone; they are beautiful red tomatoes that are easy to grow.
The second group of three is for anyone who wants to get a little more adventurous. Instead of red tomatoes, you’ll find these in three different colors!
Group #1: Red Tomatoes
My three picks are: Celebrity, Supersweet 100 and Big Beef, and here’s why.
- I have found Celebrity to be a tried-and-true addition to my garden. The plants are easy to grow and it’s rare they need staking. The tomatoes are medium-sized and quite good — much better than the grocery store tomatoes. Beyond regular watering an a little fertilizer now and then, Celebrity produces without fuss.
- Supersweet 100 has been a great performer for me — the plants sprout and grow quickly. The cherry tomatoes are produced rampantly, once the plant has been established. It’s hard to go wrong with this plant, and the cherry tomatoes are very sweet. You will need to stake this plant, however.
- Matina is an early-season heirloom tomato that tastes better than an early-season tomato usually is. The easy to grow tomatoes aren’t all that big for this variety — maybe 3 or 4 ounces — but it’s rewarding to grow. It’s indeterminate, so you can expect it to produce tomatoes into mid-season.
Group #2: Tomatoes of Different Colors
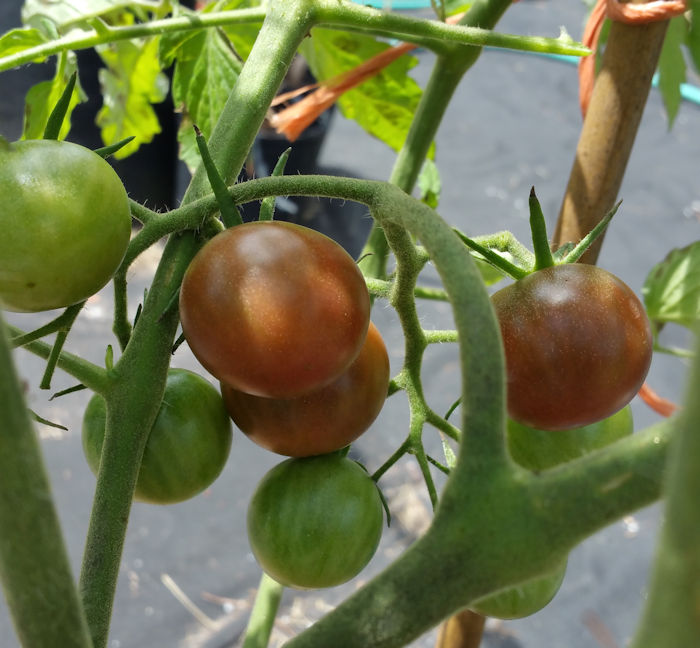
Black Cherry Tomato (not fully ripe yet)
For adventurous souls, here are my picks for different-colored tomatoes: Black Cherry, Clear Pink Early and Cherokee Purple.
- Determinate tomatoes are usually red, but Clear Pink Early is a pink determinate. It’s pink (as you might guess from the name), is relatively compact, and early season.
- Black Cherry is my suggestion for cherry tomatoes. I’ve had great luck with this cherry tomato, but what about the black? They aren’t a true black, but rather a dark dusky color. This is a mid-season indeterminate tomato; it can grow very large and be very prolific. And delicious!
- My final choice is Cherokee Purple. Cherokee Purple is one of the more widely-adapted of the heirloom tomatoes, and pretty easy to grow no matter where you are. A mid- to late-season producer, Cherokee Purple has medium to large fruits, with a heavenly tomato taste. Now as to the purple. never fear, the tomatoes are really a deep pink tinged with brown (much prettier than how it sounds). No neon colors! Altogether one of the nicest and easiest of the heirlooms to grow.
A Word to Florida Gardeners
Summers are brutal in Florida, and hard on the tomatoes; they just don’t pollinate or set fruits well in high temperatures. So, I grow my main crops in two seasons — Spring and Fall.
For a Spring crop, you’ll want to plant seeds by the middle of February (end of January is better). This way most of your tomatoes will be harvested before the temperatures get really hot. Your cherry tomatoes may continue to produce fruits, though, into the summer heat.
For a Fall crop, plant seeds by the end of May; a bit earlier if you live in the inland North Florida and Panhandle area, where it gets cooler sooner.
I can and sometimes do plant crops for Summer and Winter, seeing as I live in South Florida. However, I plant the fewest tomatoes then. While I may have a few dozen tomato plants in Spring and Fall, I may grow only 3 or 4 most summers and winters. But for the beginning tomato gardener in Florida, I don’t recommend starting out with a Summer crop — the chance of tomato diseases is higher, due to the heat and humidity. Spring will be easiest for you.
Saving Tomato Seeds
Saving tomato seeds isn’t terribly difficult, although it can get a wee bit on the aromatic side. Here are some tips on how to save tomato seeds.
Know Your Tomato Variety
The first thing is you need to know if the tomato variety you want to save the seeds from is a hybrid or open-pollinated.
A hybrid is a cross between two different tomato varieties. Seeds grown from the hybrid may or may not be like the plant from which they came. (Most likely they will be different.) Don’t save seeds from hybrids unless you want to be surprised!
If your tomato variety is open-pollinated (which includes heirlooms), then the plants you grow from the seeds you save will be just like the parent plant.
Saving Tomato Seeds
Here are the steps for saving tomato seeds.
- Pick the best examples of your ripe tomatoes (choose three or more tomatoes from each variety of the plants).
- Slice the tomatoes in half and squeeze the tomato juice and seeds into a small plastic container. Put only one tomato variety in each cup.
- Add a tablespoon of water.
- Label the container with the name of the tomato variety.
- Cover the cups loosely with plastic wrap and set them in a warm location (between 75 and 80 degrees is best). If it’s warm enough, you may want to set the cups outside because the next step can get, um, aromatic (smelly).
- Let the container set for at least three days; you will see white scum appearing on top of the liquid in the container. This is normal. And a bit strong-smelling. This is the fermentation process.
If the temperature is warm (around 80), let the container sit for another 2 or 3 days after the fermentation starts; if it’s been cooler, you may need 4 or 5 days. Then you’re ready to clean the tomato seeds.
Cleaning and Collecting the Seeds
Here’s how to clean out the containers and get the seeds. (Hint: do this outside if you can.)
- Grab a pail and either a garden hose with a pistol-grip sprayer or several small bottles of water.
- Add some water to the container with the seeds and swish it around some. The good seeds will fall to the bottom; bad seeds will float to the top.
- Dump out as much liquid as you can, along with the bad seeds, then add some more water and swish again. Dump out the excess water.
- Repeat until the water is clear, which means the seeds are clean.
- Grab a paper towel and dump the seeds onto it, to absorb any extra moisture, then transfer to a paper plate.
- Spread the seeds around on the paper plate so they aren’t piled up; they need to air dry. Label the paper plate with the tomato variety name.
- Move around the seeds once a day to make sure all sides are sufficiently dried. They should be good after two or three days, unless you have the paper plate with seeds in a humid location. If that’s the case, give it a few extra days.
- Store the seeds in a paper envelope, small plastic bag or a small container with a lid. Label your container!
Place the seeds in a cool, dry place and they should last several years (although they are best used within 2 to 3 years if possible). However, I have seeds over 10 years old that are germinating fine, even as I write this. Still, the sooner you use (or share) the seeds, the more likely they are to germinate and thrive.
Germinating Tomato Seeds, Update
In my previous post about germinating tomato seeds, I mentioned that I had planted quite a few seeds that were at least 10 years old. While I expected some of these seeds to germinate (I do have some rare seeds in my collection), I wasn’t expecting a high germination rate. At most, I was hoping 25%.
Wow, have I ever been surprised! For some of the varieties, the germination rate has been in the neighborhood of 75%. Brandywine is one of them; Yellow Cherry another. Then there are varieties in the 60% range, like Pineapple and White Bush. Of all the varieties I planted, only Big Rainbow has had a low germination rate. Then again, it might be that it’s been slower and more seedlings will start popping their heads above ground today or tomorrow.
I’m trying to decide if the Terracycle I sprayed on the soil on Sunday helped the germination, or at least hastened it. Sunday hadn’t shown much action with the seeds, but Monday a whole bunch showed up. Tuesday a whole lot more. And even today I see some more new seedlings starting through the soil.
The next batch of seeds, I’ll remember to spray the Terracycle sooner (my fault, my plant sprayer had disappeared and I had to go get a new one…and was a bit slow about it). But now I have a new sprayer.
There’s a Problem, Though…
I have a problem now, but it’s a good one to have. I planted way more seeds than I had needed, because I thought the germination rate would be really low. Yikes! I now have way more tomato plants than I have containers, by a large margin. Time to gift my family and friends with some seedlings, or maybe take them to a farmer’s market to sell, in another month or so (after the second transplant).
So, don’t throw out those old seeds without giving them a try, and keep in mind that they may take somewhat longer to germinate than newer seeds. Remember, when germinating, tomato seeds like warmth and humidity.
I’ll give another update next week on how the seedlings are faring.
Homegrown Tomato Shapes
Shapes for homegrown tomatoes may surprise you, if you’ve never grown them before. While some varieties may look like the unblemished round globes you see in the grocery store, many won’t look like that. On the other hand, looks can be deceiving, because even if the homegrown tomatoes don’t look as perfect, they taste soooo much better!
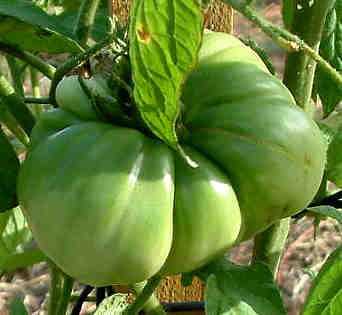
Brandywine Tomato
Tomato Shapes
First, different tomato varieties have different shapes. Some are round, some flattened. Some are smooth, others are ribbed. Not to mention there are varieties selected for their unusual shapes — sausage, pear, pleated, heart-shaped, etc.
Next, the conditions under which the tomatoes are grown can effect the fruits. For example, tomatoes that grow too fast may end up cracking. To much variation of the water level (letting them get too dry then giving them too much water) can affect the fruits, too.
Different tomato diseases can affect the fruits — anywhere from slightly “off”, all the way to the tomato is a loss.
And then there are the rogue tomatoes that just want to grow their own way, for their own reasons. 🙂
Ribs and Shoulders
As I mentioned previously, some tomatoes (especially heirlooms) just don’t grow round. They may have a lot of ribbing (pleats) around the shoulders (the end nearest to where the fruit connects to the plant).
Speaking of shoulders, they may not turn colors — sometimes the shoulders of an otherwise red or pink tomato stay green, even when ripe.
Homegrown Tomatoes May Not Be Perfect Looking…
No, your homegrown tomatoes may not look perfect, like what you see at the grocery store. But while what sells in the stores might be their looks, you can’t tell the taste until you bite into it (which isn’t appropriate in the store).
On the other hand, even if your garden-grown tomato is homely-looking, it likely tastes fabulous! And really, that’s the reason you are growing them — for the wonderful taste.